How to Make a Bun Hairstyle
Let’s be honest the bun hairstyle is a lifesaver. Whether you’re running late, pretending you’ve got your life together, or just want to keep your hair out of your face while inhaling a tub of ice cream (no judgment here), a good bun gets the job done. But making a bun look effortlessly chic without resembling a bird’s nest? Yeah, that’s an art form.
I’ve had my fair share of hair disasters trying to whip together the “perfect” bun. One side too puffy, the other too flat. Bobby pins poking out like antennae. Sigh. But over time (and lots of bad selfies), I figured out a few foolproof ways to make buns that actually look good and stay put. So, ready to bun it up like a pro? Let’s go.
Why a Bun is Basically the MVP of Hairstyles
First off, let’s give the bun a standing ovation.
It’s versatile, quick, and suits almost everyone what more could you ask for? You can rock a sleek ballerina bun at a wedding or a messy top knot while binge-watching reality TV. And the best part? No need for fancy tools or a glam squad.
Still not convinced? Here’s why buns are a total win:
- Great for any hair length (well, medium to long sorry, pixie crew)
- Protective style for those days when heat tools need a break
- Keeps your neck cool in summer, which is honestly a blessing
- Can be dressed up or down from yoga class to cocktail hour
The Basics Tools You’ll Need

You don’t need a drawer full of products or salon-level gear to make a killer bun. Here’s your must-have list:
Hairbrush or comb (because, duh)
Elastic hair ties (preferably the snag-free kind)
Bobby pins (lots of ‘em seriously, they vanish)
Hairspray or texturizing spray (optional but helps a lot)
Donut bun sponge (if you’re feeling fancy or need volume)
FYI: If you’re dealing with freshly washed, slippery hair, sprinkle in a bit of dry shampoo or texture spray to give it some grip.
Classic Low Bun Sleek & Simple

Ah yes, the classic low bun. She’s elegant, she’s minimal, she doesn’t scream “I tried too hard.”
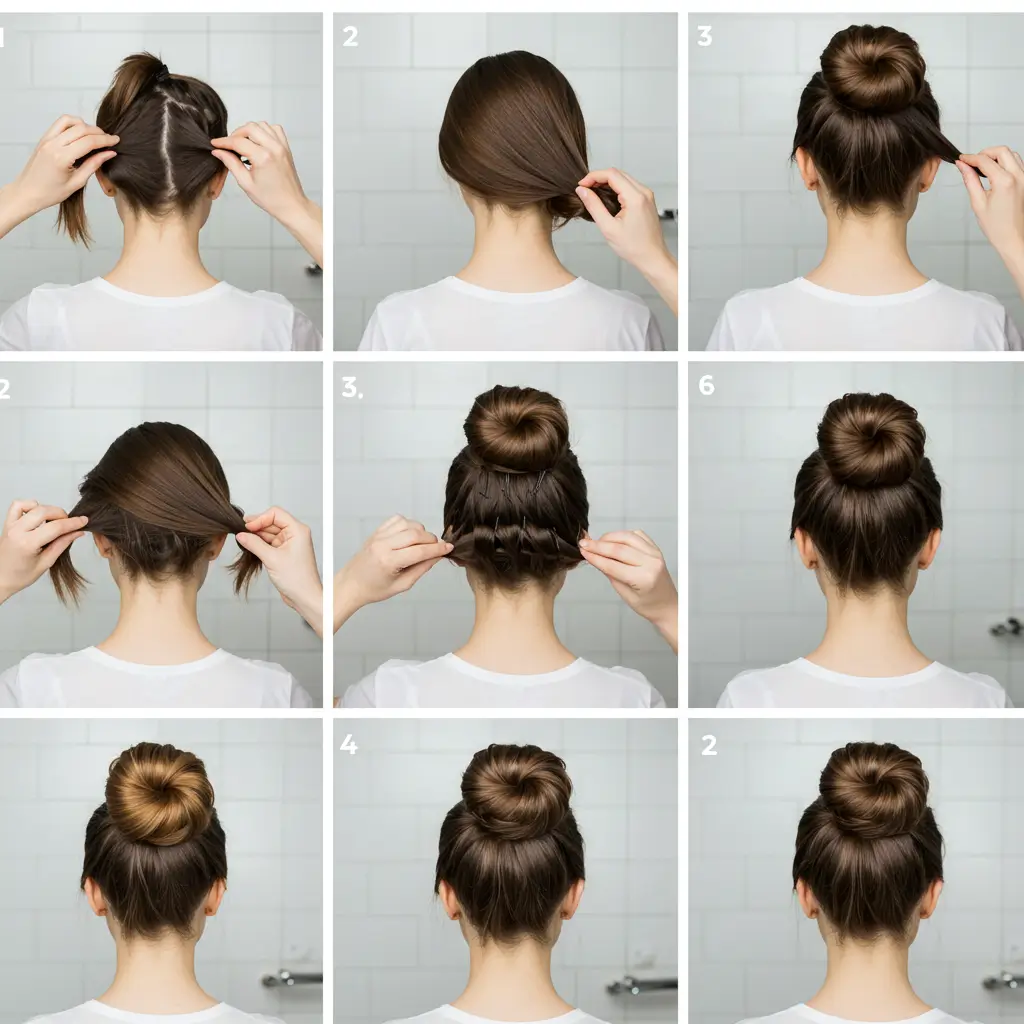
Steps to Make It Happen
- Brush your hair back into a low ponytail at the nape of your neck.
- Secure it with a hair tie (nothing fancy).
- Twist the ponytail like you’re wringing out a towel.
- Wrap it around the base of the ponytail until it forms a coil.
- Pin it in place with bobby pins slide them in like you’re locking it down for battle.
- Spray to hold if you’re expecting wind, dancing, or toddlers grabbing your hair.
Pro Tip: Smooth flyaways with a toothbrush and a little hairspray. Yes, you read that right. A toothbrush.
The Messy Bun Effortlessly Cool (Even if You Tried Really Hard)
This one’s perfect when you want that “I woke up like this” vibe even if you actually took 15 minutes and cursed twice.
How to Master the Mess
- Flip your head over and gather your hair into a high ponytail.
- Loosely twist the hair, but not too tight—you want volume.
- Wrap the twist into a bun and let some strands fall naturally.
- Secure with bobby pins and gently tug pieces out around your face.
- Scrunch and fluff with your fingers for that messy magic.
IMO, a messy bun is like eyeliner there’s always one side better than the other, and we’ve made peace with that.
Donut Bun For When You Want Extra Volume (or You’re Faking It)
No shame in the bun sponge game. It gives you that big, full look like you’ve got Rapunzel-level hair even if you don’t. If you’re working with medium-length hair or longer, this style adds just the right amount of drama without extra effort.
Donut Bun 101
- Pull your hair into a ponytail (high, mid, or low it’s your vibe).
- Slide the donut sponge over the ponytail like a scrunchie.
- Spread your hair evenly over the sponge and tuck it underneath.
- Wrap extra hair around the base and pin it in place.
- Adjust and spritz for sleekness or volume, depending on your mood.
Feeling fancy? Add a silk scarf around the bun or stick in a few pearl pins. Boom instant glam.
Bun Tips You Didn’t Know You Needed (But Totally Do)

Let me drop some bun wisdom on you:
- Second-day hair is ideal—a little grease = better grip.
- Criss-cross your bobby pins to make them actually stay put.
- Use a scrunchie if you want a looser, softer hold.
- Tilt your head back slightly when making a bun to avoid the dreaded neck lump.
- Sleep in a loose top knot for heatless waves in the morning two birds, one bun
Ever wonder why your bun always sags halfway through the day? It’s probably because your hair tie’s too loose or you’re using cheap pins. Invest in the good stuff it makes a difference.
Bun Variations to Try When You’re Bored of the Basics
Variety is the spice of buns. (Wait… that came out weird.)
Anyway, try these styles when you’re in the mood to switch things up:
Double buns (hello, space buns!)
Half-up bun (aka the “hun” cute and casual)
Side bun (romantic AF)
Braided bun (extra detail, zero effort)
Twisted bun (looks way more complicated than it is)
Want more bun ideas? Check out our guide to experiment based on your vibe and hair length.
Each one gives off a totally different vibe, so experiment and see which one you like best.
Bun and Done

And there you have it the ultimate guide on how to make a bun hairstyle that doesn’t suck. Whether you want sleek, messy, or somewhere in between, there’s a bun style that works for your hair type, your mood, and your “I have 3 minutes before this Zoom call” panic.
Buns are simple, stylish, and secretly powerful. Seriously, something about putting your hair up makes you feel like a boss. So next time your hair’s not cooperating, don’t freak out just bun it. And if you’re looking to change things up with color or style, explore our hair color and hairstyles sections for more inspiration.